Are you like most homeowners who get frustrated when you’re trying to enjoy a warm bath or shower and you just can’t seem to ignore those cracks in the caulk around you? It’s such a tiny thing and you keep telling yourself that you are going to get around to taking care of it, but just don’t.
Hey, I get it. Such a small task and such a tiny eyesore that you really shouldn’t even notice it. But, you do.
In this blog post, we will get down to the bottom of why bathroom caulk keeps cracking, how you can fix it, and some other helpful tips when keeping up with the caulking around your bathroom.
So, let’s get into it!
Why Does My Bathroom Caulk Keep Cracking?
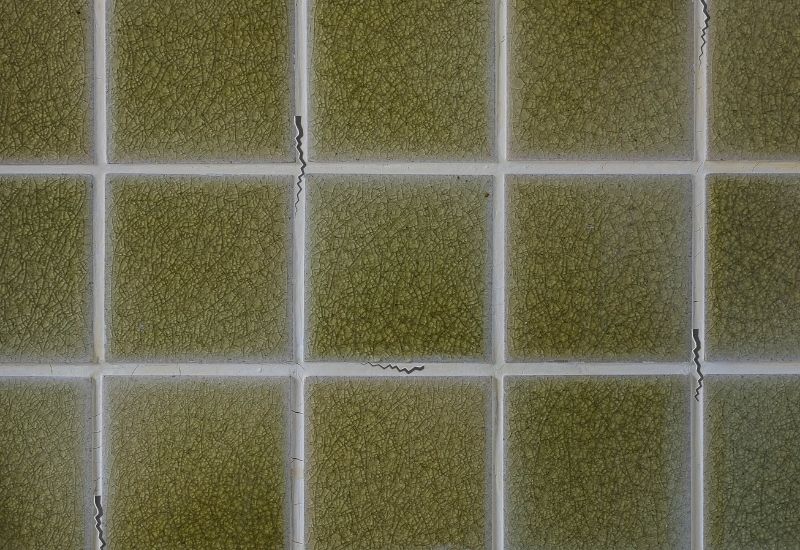
There are several different reasons why your bathroom caulk keeps cracking. Here are the six most likely culprits.
- The wrong kind of caulk was used
- The old caulk was applied when the temperature was below 40 degrees F
- The newer caulk was applied over the top of the existing caulk
- The house is settling
- The gap is too wide for the kind of caulk used
- The application of the caulk was done improperly
How about we take a little bit of a deeper dive into each of these possible reasons for the cracks in your bathroom caulk?
The Wrong Kind of Caulk
There are two different types of caulk that can be commonly used in the bathroom; silicone and acrylic(latex). Both have their pros and cons, but it is important to use the right kind for the job at hand. Using pure silicone is your best bet when working within the bathroom. Silicone has the reputation of being one of the most durable caulks on the market and can stand up to bathroom mold and mildew.
Furthermore, silicone is better at standing up to watersoaked areas and being more pliable, which is great when your shower expands and shrinks with the change in temperature.
The acrylic products are not as good at adhering to the intended surface, but they are easier to work with than silicone. Acrylic is also less expensive than silicone and is more forgiving if you plan on painting over top of it. Just know that your shelf life may not be as long as the pure silicone option.
The Old Caulk Was Applied When the Temperature Was Below 40 Degrees F
Caulk can be temperamental and needs to be applied within a certain temperature range or it will not adhere properly. Most caulks have a range in which they can be applied, but the general rule of thumb is that the temperature should be above 40 degrees F.
If the old caulk was applied when the temperature was below 40 degrees F, then it is likely the caulk has lost its adhesion and is now cracking.

Something to consider is that it’s not just about the temperature in the bathroom, it’s also the temperature of the caulk itself. If you left the caulk sit overnight in the garage or your car during the winter, make sure you give it plenty of time inside to thaw out before use.
The Newer Caulk Was Applied Over the Top of the Existing Caulk
Similar to the point above, if you apply a new layer of caulk over the top of an existing layer then it will likely not adhere properly.
The reason for this is that the older layer of caulk is most likely already losing its adhesion and adding another layer on top, it’s only making the problem worse.
Also, if it’s not a cracking issue, but instead a molding issue, please do not simply try to just caulk over the top. This is harmful to you and others and should not be done in any situation.
The House Is Settling
This is a common problem that can affect any part of the house, not just the bathroom caulk. When the house settles, it creates small gaps in between the caulked surfaces.
While this does not necessarily mean you have to caulk again, it is something to be aware of and keep an eye on.
A house will settle because of many different reasons such as the weight of the house, changes in temperature, or even the ground underneath shifting.
While you may not be able to do anything about the shift, you can caulk the gap as a temporary fix.
The Gap Is Too Wide for the Kind of Caulk Used

If the gap between the surfaces is too wide, then it can be difficult for the caulk to form a proper seal. This can be due to a number of reasons such as the age of the caulking, poor surface preparation, or even an imbalance in the bathroom surfaces. In order to fix this problem, you may need to use a different type of caulk or even just apply a wider bead of caulk.
Similarly, it’s not uncommon that the gap isn’t wide enough. In this case, you may need to use a thinner bead of caulk or even just apply more pressure while smoothing it out.
The Surface Wasn’t Prepared Properly Before Caulking
Surface preparation is key when caulking and if not done properly, it can lead to a number of problems such as the caulk not adhering, uneven surfaces, or even gaps in the caulk.
In order to prepare the surface properly, you will need to clean it with soap and water to remove any dirt or grime. Once the surface is clean, you will need to allow it to dry completely before applying the caulk.
If you are caulking around a bathtub or shower, you will also need to make sure that the area is clear of any soap scum or mildew. This can be done by using a bathroom cleaner or even bleach.
How Do You Fix Cracks in Bathroom Caulking?
Now that we know why the bathroom caulk is cracking, how do we go about fixing this problem?
Simple, just a few easy steps to follow.

First, we need to remove the old caulk. How do we do this, you ask? Well, we should start by softening the old caulk to make the removal easier on you and safer for the bathroom material (avoiding scratches and breaking tile). There are two common methods to try and soften caulk. The first is by use of a heat gun, and the second is by applying a softening solution.
Once the old caulk is soft, we can use a putty knife or chisel to remove it. Just be careful not to damage the bathroom surfaces in the process.
If there are any cracks in the bathroom surface, we will want to fill these in before applying new caulk. We can do this by using a bathroom caulk or even a bathroom sealant.
Once the cracks are filled, I recommend using a little rubbing alcohol on the surface area to help the new caulk adhere better. Once the surface has been cleaned and dried, now we move on to prepping and applying the new (appropriately selected) caulk.
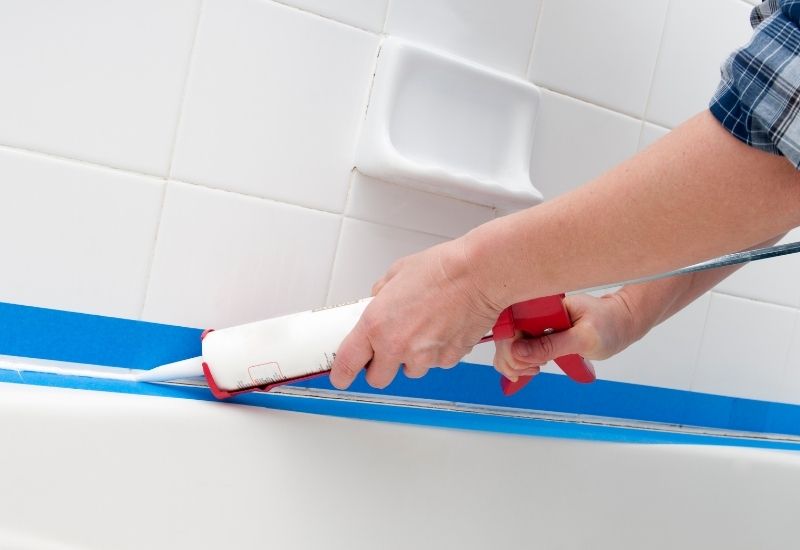
I’d recommend using some painter’s tape around the area of the gap so you don’t have to worry too much about extra cleanup.
Now, let’s apply the new caulk!
When doing so, we should use a good quality bathroom caulk and apply it in a smooth, even bead. Once the new caulk is in place, we can use our finger (or a damp cloth) to smooth it out and remove any excess. Be sure to read the directions of the caulk you used to provide ample time for the drying process.
After that, sit back and enjoy the fruits of your labor.
Can You Caulk Over Cracked Caulk?
Technically, you can caulk over cracked caulk, but it is not recommended.
Caulking over cracked caulk will not fix the problem and may only make it worse.
The cracks could still be visible or the caulk may start to peel and crack as well. It is best to remove the old caulk completely and start from scratch.
However, if you do decide to simply caulk over the old caulk, do yourself a favor and clean the surface area as best you can. Once it is clean (and dry), make sure to use the same kind of caulk material you used with the old application. This will limit the chance of the new caulk cracking or being prone to leaking.
How Often Should bathroom Caulk be Replaced?
The general rule of thumb is that bathroom caulk should be replaced every 3-5 years. However, this will depend on the frequency of use and the overall condition of the caulk.
If you notice any cracks or gaps, it is best to replace the caulk as soon as possible. Allowing the caulk to crack or peel will only make the problem worse and could lead to leaks.
Again, be sure to read the directions on the back of the caulk for proper installation and advice to get the most out of your product. While many manufacturers say that their caulk will last a good 10 years, I rarely ever see this being the case.
Final Thoughts
So, there you have it! These are just a few tips on bathroom caulk and how to prevent it from cracking. By following these simple tips, you can help extend the life of your bathroom caulk and keep those pesky cracks at bay.
If you have any other questions or concerns, please don’t hesitate to reach out. I’m always happy to help. Thanks for reading!